Roster Cycles
Roster Cycles lets you create a reusable pattern of worked and off days, assign it to a group or employee, and generate roster shifts for a selected date range.
The workflow has three stages:
- Create an Active roster cycle template.
- Save a cycle assignment for a group or employee.
- Run the assignment to preview and generate roster shifts.
Open Roster Cycle
- Open Rosters from the main menu.
- Select Roster Cycle.
Roster Cycle requires Roster access and an Enterprise plan, where the feature is available. If Roster Cycle is not shown, ask your account administrator to check your access and feature availability.
Roster Cycle Template Page
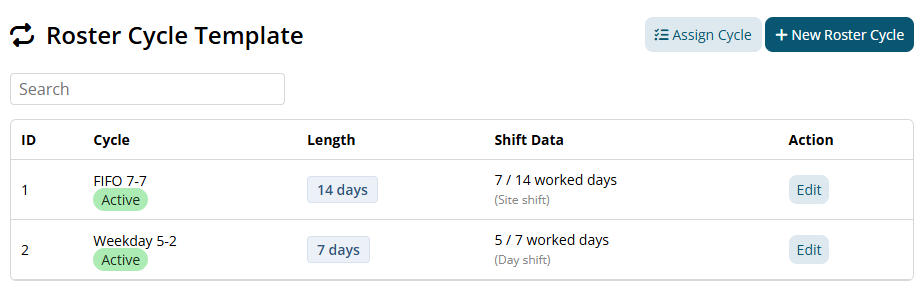
The Roster Cycle Template page lists the reusable roster patterns for your business.
The table shows:
- Cycle: The cycle title and whether it is Active or Draft.
- Length: The number of days before the pattern repeats.
- Shift Data: The number of worked days configured in the cycle.
- Action: Opens the cycle for editing.
Use the Search field to find a cycle by the information shown in the table.
Select New Roster Cycle to create a pattern, or select Assign Cycle to open the assignment page.
Create a Roster Cycle
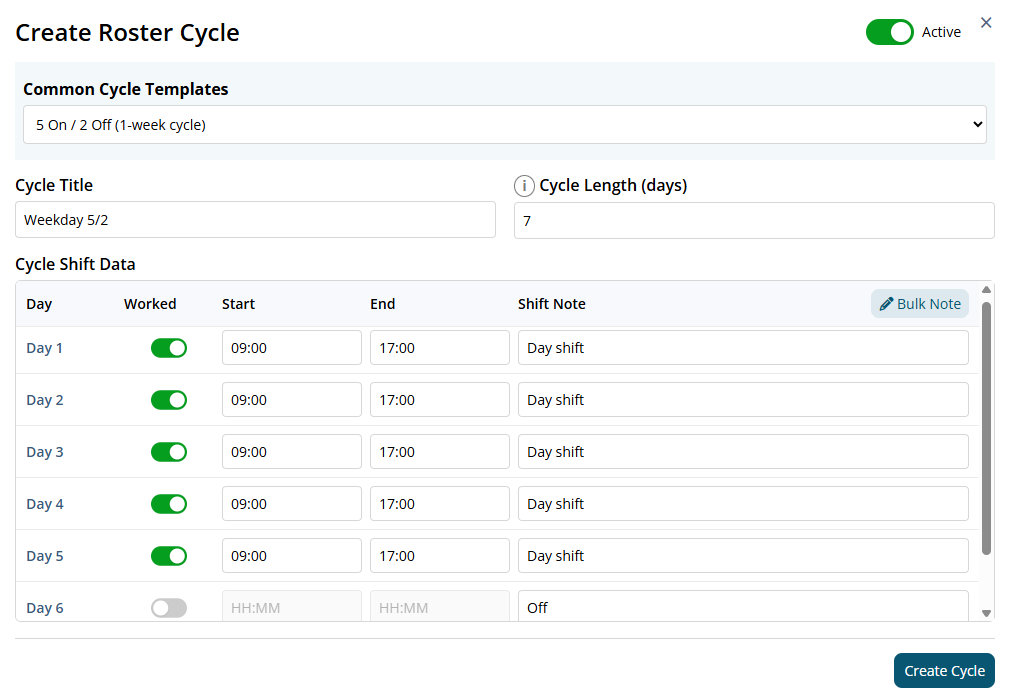
- Select New Roster Cycle.
- Optionally select a pattern under Common Cycle Templates.
- Review or enter the Cycle Title.
- Enter the Cycle Length (days).
- Configure each day under Cycle Shift Data.
The current form supports cycle lengths from 1 to 50 days. The cycle length is the number of days before the pattern starts again.
Available templates include:
- 7 On / 7 Off (2-week cycle)
- 14 On / 7 Off (3-week cycle)
- 14 On / 14 Off (4-week cycle)
- 5 On / 2 Off (1-week cycle)
- 8 On / 6 Off (2-week cycle)
- 21 On / 7 Off (4-week cycle)
A template is a starting point. You can change its title, length, worked days, times, and notes before saving.
Configure Worked and Off Days
For each day in the cycle:
- Turn on Worked if the day should create a roster shift.
- Enter the Start and End times in HH:MM format.
- Enter an optional Shift Note.
- Turn off Worked for an off day.
Worked days require both a valid Start time and a valid End time. Off days do not create roster shifts.
For a repeating note, select Bulk Note, enter the note, and select the checkmark. The note is applied to all worked days. Leaving the bulk note blank clears notes from worked days.
Review every day in the pattern, including overnight shift times and day-specific notes.
Set the Cycle Status and Save
- Turn on Active when the cycle is ready to use.
- Leave Active off to save the cycle as a Draft.
- Select Create Cycle.
Draft cycles are saved for later editing but are not available in the assignment cycle selector. Activate the cycle before creating an assignment.
Edit, Clone, or Delete a Cycle
- Find the cycle in the template list. Use Search if needed.
- Select Edit.
- Change the title, Active status, cycle length, worked or off days, times, or notes.
- Select Update Cycle.
Select Clone to use the current cycle as the starting point for a new cycle. Change the title or pattern, then select Create Cycle.
Select Delete and confirm the prompt to remove a cycle.
Important: Editing or deleting a cycle does not change or remove roster shifts that were already generated. Run the related assignment again if future roster shifts should use an updated cycle.

Assigning a Roster Cycle to Staff
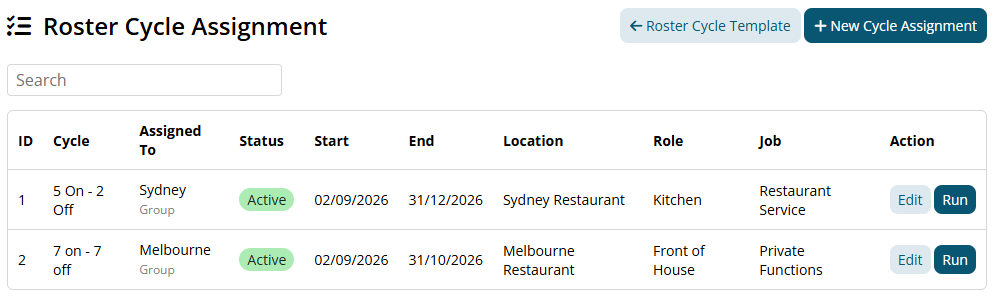
Once a Roster Cycle Template has been created, the cycle can be assigned to staff from the Roster Cycle Assignment page.
From the template page, select Assign Cycle. You can also open Rosters > Roster Cycle from the main menu.
The assignment page lists the cycle, target group or employee, status, dates, Location, Role, Job, and available actions.
Creating a New Roster Cycle Assignment
Select New Cycle Assignment.
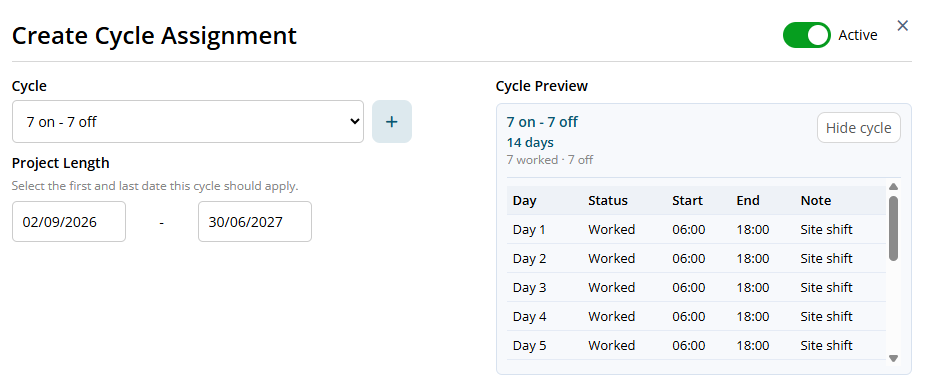
Select the Cycle and Project Length
- Select an Active cycle under Cycle.
- Under Project Length, select the first and last date this cycle should apply.
- Review the Cycle Preview.
The Cycle Preview shows the cycle title, length, and worked/off-day counts. Select View cycle to see the day-by-day pattern.
If you need to create a new cycle while making the assignment, select the + button beside Cycle. Save the new cycle as Active if it should be used immediately.
Choose the Assignment Target
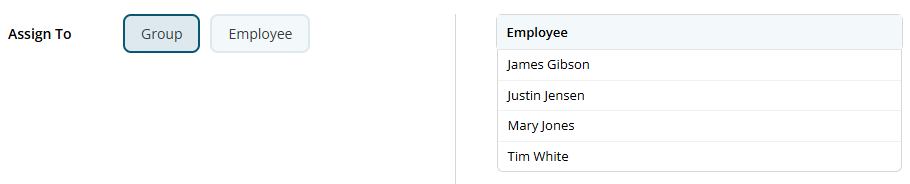
- Under Assign To, select Group or Employee.
- Select the required group or active employee.
- Review the employee list shown in the assignment window.
For a Group assignment, the employee list includes active employees who match the selected group, Location, and Role.
For an Employee assignment, select one active employee.
Add Location, Role, and Job
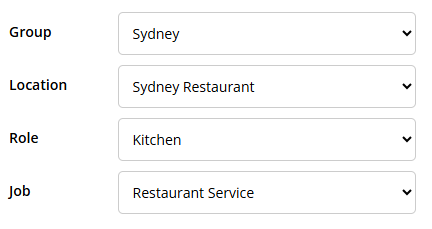
- Select the relevant Location.
- If the Location has available roles, select a Role.
- Where available, select a Job or leave Default Job selected.
- Confirm that the employee list contains everyone who should receive the cycle.
For Group assignments, a Location is required. A Role is required when roles are available for the selected Location.
Location, Role, Job, and Shift Note information is copied to roster shifts generated from the assignment. Job options depend on the selected Location and client. A Location default Job may be used when no specific Job is selected.
Activate and Save the Assignment
- Turn on Active when the assignment is ready to run.
- Select Apply.
A Draft assignment is saved but cannot be run. An Active assignment appears in the assignment list with a Run button.
After the assignment is saved, both Project Length dates are locked. The original start date remains fixed so the cycle-day alignment does not change. Create a new assignment if a different date range is required.
Run an Assignment and Generate Roster Shifts
- Find the Active assignment in the assignment list.
- Select Run.
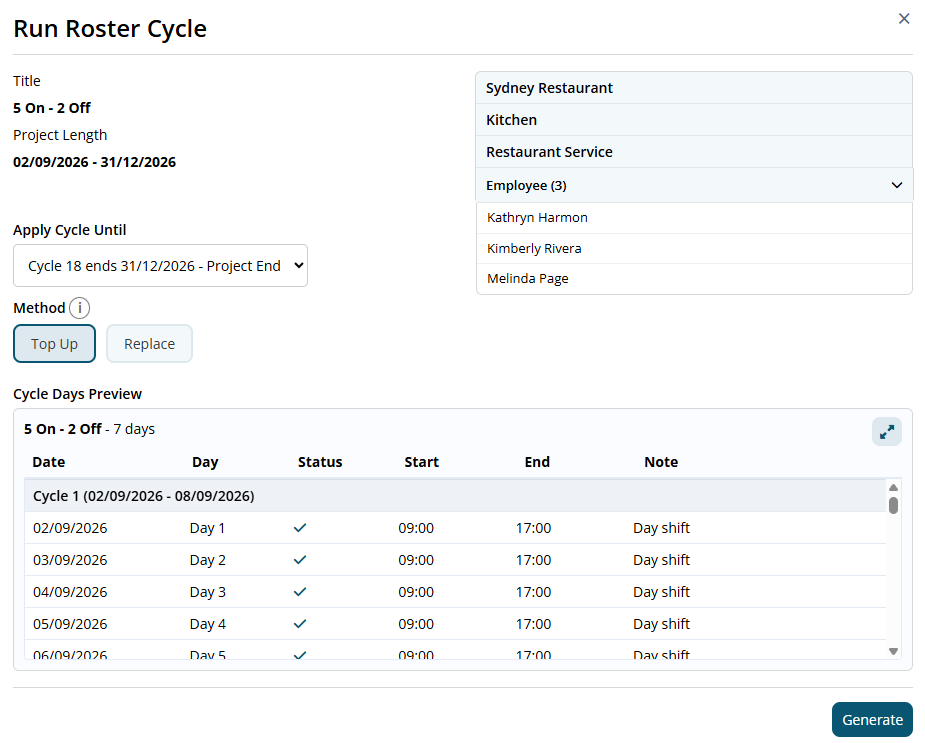
- Review the cycle title, Project Length, Location, Role, Job, and employee list.
- Under Apply Cycle Until, select how far the cycle should be generated.
- Review the Cycle Days Preview.
- Choose Top Up or Replace.
- Top Up: keep existing roster shifts and create cycle shifts where no roster shift exists
- Replace: delete roster shifts in the selected range, then create the cycle roster.
- Select Generate.
- Review the mass-update confirmation and confirm the action.
Apply Cycle Until shows cycle-aligned end dates within the Project Length. The final option is marked Project End. Project End is valid even when it falls part-way through a cycle; only the dates up to the Project End are generated.
If the assignment started in the past, the cycle remains aligned to its original start date. Dates before yesterday are skipped, and generation begins at the first current cycle that matches the original alignment.
Review the Cycle Days Preview
After selecting an Apply Cycle Until date, the Cycle Days Preview shows:
- Each calendar date.
- The cycle number and cycle date range.
- The cycle day.
- Whether the day is worked or off.
- Shift start and end times.
- Shift notes.
Use the expand button to enlarge the preview when required.
Check Existing Roster Shifts
The Run window checks the selected roster range after an Apply Cycle Until date is selected.
- If existing shifts are found, review the number of shifts and select View to inspect the roster.
- If a roster week is locked, select Open Roster, unlock the affected week, and return to the Run window.
Generate remains unavailable until the cycle end date, employee list, roster lookup, and locked-week checks are valid.
- Top Up: Keeps an existing roster entry for a matched employee and date, then creates the cycle shift only where no roster entry exists.
- Replace: Removes roster entries for matched employees in the selected generation range, then creates the worked shifts from the cycle.
Use Top Up when existing roster changes should be protected. Use Replace only when the selected range should be rebuilt from the cycle.
Warning: Replace can remove manually entered shifts or shifts created by another process. Top Up can recreate a deliberately removed cycle day because the date no longer has a roster entry.
Confirm and Check the Result
Selecting Generate opens a confirmation showing the number of staff, date range, skipped dates, and selected method.
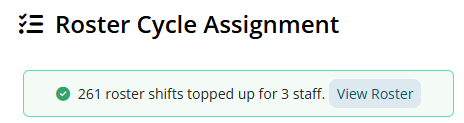
After generation, a success message reports how many roster shifts were created or replaced and how many staff were affected. Select View Roster to check the dates, times, notes, Location, Role, Job, and any existing shifts that should remain.
Edit or Re-run an Assignment
Select Edit beside an assignment to change its cycle, target, Active status, Location, Role, or Job.
The Project Length dates cannot be changed after the assignment is saved. Create a new assignment if a different date range is required.
Select Apply to save assignment changes. Then select Run when you are ready to preview and generate roster shifts.
Deleting an assignment removes the saved assignment only. It does not remove roster shifts that were previously generated.
Add a New Employee to an Existing Group Cycle
Adding an employee to a group does not automatically create roster shifts. The employee must match the assignment when the roster is generated.
- Add the employee to the required group.
- Configure the employee's Location and Role access.
- Open Roster Cycle Assignment.
- Select Run beside the existing Active group assignment.
- Expand the Employee list and confirm that the new employee is included.
- Select the required date under Apply Cycle Until.
- Choose Top Up.
- Review the Cycle Days Preview and existing-roster summary.
- Select Generate and confirm the action.
- Select View Roster to check the result.
The employee follows the same cycle-day alignment as the rest of the group. Top Up creates missing cycle shifts for the new employee while preserving existing roster entries for other matched employees.
Important: Review intentional roster gaps before re-running. Top Up may recreate a cycle day that was deliberately removed because that date no longer has a roster entry.
Troubleshooting
Roster Cycle Is Not Shown
Check that your account has Roster access, an Enterprise plan, and access to the feature. If the menu item is still unavailable, ask your account administrator to check the account settings.
No Cycles Appear in the Assignment Selector
Only Active cycles appear in the assignment selector. Edit the cycle, turn on Active, and select Update Cycle.
Apply Is Unavailable
Check that:
- An Active cycle is selected.
- The Project Length dates are valid.
- A Group or Employee is selected.
- A Location is selected for a Group assignment.
- A Role is selected when required by the Location.
- At least one active employee matches the assignment.
No Employees Match
Review the selected Group, Location, and Role. Employees must be active and match the selected group and access configuration.
No Apply Cycle Until Date Is Available
Check that the Project Length includes a current or future part of the cycle. If the assignment has ended or the required date range is incorrect, create a new assignment with the required Project Length.
If the final option is marked Project End, it can still be used when the project ends part-way through a cycle.
Generate Is Unavailable
Select an Apply Cycle Until date and wait for the roster check to finish. Resolve any warning, confirm that employees match the assignment, and unlock every affected roster week.
Fewer Shifts Were Created Than Expected
This can occur when:
- The cycle contains off days.
- An employee already has a roster entry for the date and Top Up preserves it.
- Dates before yesterday were skipped.
- The employee did not match the Group, Location, or Role at the time of generation.
Existing Shifts Disappeared
Check whether Replace was used. Replace removes roster entries for matched employees in the selected generation range before creating the cycle shifts.
Changing the Cycle Did Not Change the Roster
Editing a cycle does not update shifts that are already in the roster. Run the related assignment again for the future date range that should use the updated pattern.
Project Length Dates Are Locked
This is expected after an assignment is saved. Create a new assignment if a different start or end date is required.
Recommended Workflow
- Create the roster cycle as a Draft.
- Review every worked day, off day, time, and note.
- Turn on Active and save the cycle.
- Create an assignment for a short, easy-to-review Project Length.
- Select the Group or Employee and confirm the employee list.
- Confirm the Location, Role, and Job.
- Select Apply to save the assignment.
- Select Run and choose an Apply Cycle Until date.
- Use Top Up unless existing shifts are intentionally being replaced.
- Select Generate, confirm the action, and review the result in View Roster.