Facial Recognition Installation & Setup
This guide will take you through the process of setting up an iPad for use with the NoahFace Facial-Recognition Software in Microkeeper.
Important information before you begin
iPad version requirements
The NoahFace App runs on any Apple iPad that is running iPad OS 14.0 or later.
In most circumstances, NoahFace recommends the 9th generation Apple iPad.
If you require a smaller screen, the NoahFace App will run on an iPad Mini.
If you require 3D liveness detection (optional feature), the NoahFace App can take advantage of the TruDepth camera on an iPad Pro.
The NoahFace App is designed to be permanently wall mounted - see our Hardware page for recommended mounts.
The NoahFace App requires a network connection via either:
- Wifi
- Ethernet (using a Belkin adaptor)
- 4G/5G
Download NoahFace on the App Store
![]()
Setting up your iPad settings for Noahface usage
Before you start using NoahFace app, it is recommend to configure the iPad with the recommended instructions from Noahface:
Setting up your iPad resource by Noahface
iPad Location
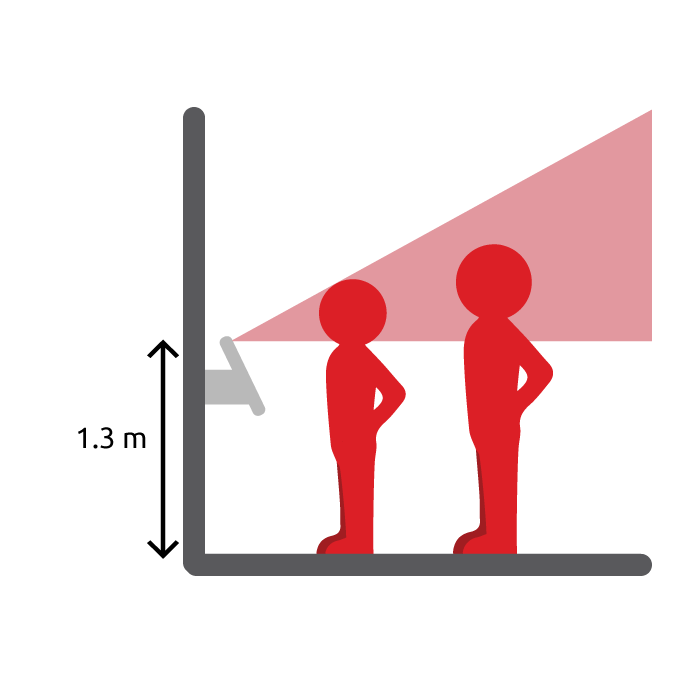
The first thing to consider when installing the iPad Time and Attendance is where to physically mount the iPad.
Where possible, the iPad should be mounted:
- At a location that has constant light during the day (i.e.: not facing a window)
- Either:
- Flush to a wall, with the camera eye is between 150cm and 155cm from the ground.
- At 130+cm from the ground, angled slightly towards the ceiling.
- On a bench, angled even more towards the ceiling.
- With the camera eye at the top of the iPad.
- Securely, so the iPad cannot be moved, tilted, or easily stolen.
Powering the iPad
Your iPad must be permanently powered by either:
- The standard Apple iPad power adaptor, if you have a nearby power point (the standard USB cables are only 1m long).
- A higher wattage power adaptor and a USB extension cable.
- Power over Ethernet (POE) adaptor eg: Belkin Ethernet + Power Adapter with Lightning Connector.
It is imperative that you test your iPad to make sure it retains its full charge when the NoahFace App is running.
A few things to consider:
- The standard iPhone charger will not provide sufficient power for an iPad.
- The brightness on your iPad screen can impact the power drain if you have it set to its maximum setting.
- The zoom setting in the NoahFace App can impact the power drain. Unless it is absolutely necessary, it is recommended to leave the zoom setting (under Camera/Settings) at its default (non-zoomed) setting.
Connecting to your Network
The NoahFace App will continue to work if you temporarily lose your Internet connection, however, you should plan for it to be permanently connected to your network by either:
- A WIFI access point.
- Power over Ethernet (POE) adaptor eg: Belkin Ethernet + Power Adapter with Lightning Connector.
Connect NoahFace to your Microkeeper organisation
A unique registration code is required to sync your NoahFace app to your Microkeeper account. If you have not already received this code, contact our support team for assistance.
Download NoahFace on the App Store
![]()
Installation Configuration
Opening the NoahFace app for the first time will prompt a configuration setup. Follow the steps below:
- Welcome to NoahFace. The future is touchless
- Click Next
- Connect the NoahFace App to your NoahFace account or use it stand-alone?
- Connect or Stand-Alone. Select "Connect"
- Enter your Activation Code to connect the NoahFace App to your account
- Enter the provided activation code. If you have not already received this code, contact our support team for assistance.
- NoahFace needs to use your camera to identify users.
- Click Next
- "NoahFace" Would Like to Access the Camera. This is needed so you can recognise users and record their access.
- Ok or Don't Allow. Select "Ok"
- Does your iPad mounting location have constant or variable lighting?
- Constant or Variable. Select the applicable option
- You are now ready to start using NoahFace
- Click Start
- Click Start
Registering an Employee
To register users to use NoahFace, each user should:
- Stand in front of the iPad, ideally an arms-length away, and look at the iPad.
- Look at the Microkeeper screen until:
- The green bar at the top moves to 100%.
- The green Register button should become enabled.
- If the green bar does not move to 100%, they should try rotating their head slightly, moving slightly closer/further from the iPad, or removing their glasses.
- On the Welcome screen, press the Register button.
- Select the Employee's name from the list or search on the left.
- The Manager will then need to enter their Passcode to complete the Registration
- The Employee can then click Clock On, to start their shift.
During the registration process, it is critical that the manager stands to the side of the iPad so they are not in the camera view.
Once a user is registered, the manager should ask them to test the recognition process by standing in front of the iPad again.
The registration passcode is sent to any Manager with NFC tags, Fingerprints, Facial access in their Employee Profile via email.

Adjusting the Camera
To achieve good recognition results, it is critical that the camera is adjusted to produce optimal images.
This can be done by a manager. First, touch the NoahFace icon in the bottom right, then enter your Admin Passcode.
Then under Settings > Camera, you can make the required adjustments.
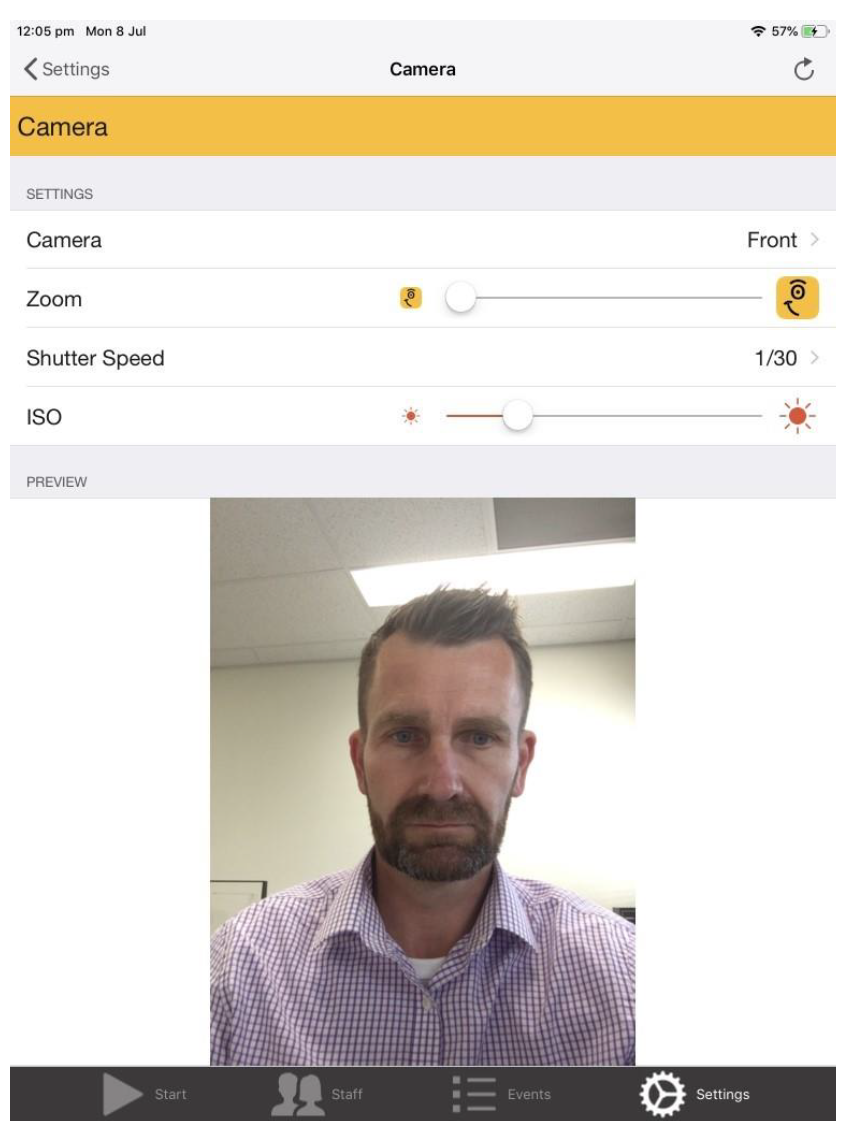
If you have constant indoor lighting, it is recommending to set your Shutter Speed to a fixed value (typically 1/30 or 1/15 will produce good results).
You can then adjust the ISO setting to obtain a bright and clear face.
If you have variable lighting and you cannot relocate your iPad, you should set your Shutter Speed to Automatic.
You can then adjust the Brightness setting to obtain a bright and clear face.
Backlight
If you have a strong backlight (i.e.: light coming from directly behind people from a nearby window or spotlight) NoahFace will not be able to recognise people because their facial features will not be clear.
An extreme example of this is below, with the camera facing directly at a window:
Even if you adjust the brightness on the image, this will not help, because the contrast will not be sufficient to identify facial features.

If you have back light issues, the only answers are:
- Change mounting location. Consider moving the iPad to a new mounting location that is away from windows and does not have strong backlighting.
- Add physical shading. Consider installing permanent window shades, window tinting, or awnings.
- Increase front lighting. Consider putting a spotlight close to the wall above the iPad, which will illuminate faces.
auto
You can also make sure you are running a recent model iPad. If you are trying to run NoahFace on an older model iPad, the camera is nowhere near as good at eliminating backlight.
Installation Guides
You can find the installation guide for the Enclosed iPad Mount here
You can find the installation guide for the iPad Stand here