A laundry allowance can be set up to be paid automatically to an employee every payrun using an Extra Earnings Rule.
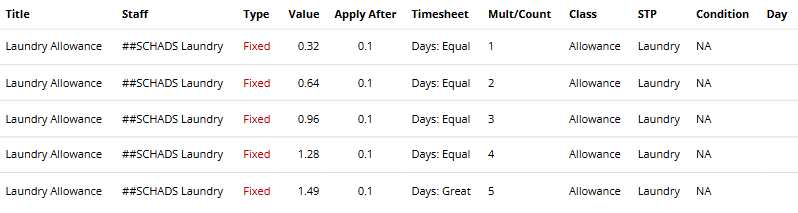
In this example, we are setting up a Laundry Allowance that is paid to every employee that is entitled to it. When an employee is assigned to the group, the payslip will automatically add $1.20 per shift up to a maximum of $5.98 per week.
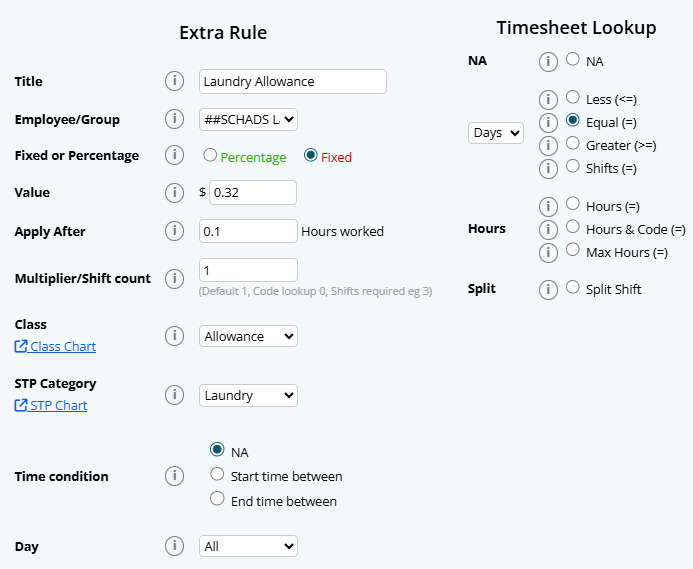
Navigate to Menu > Settings > Payroll Rules > Extra Rules, then click the Create New Rule button to configure the allowance.
Key values to configure:
- Title: This will be the Payslip title of the allowance. For example "Laundry Allowance".
- Type: Select "Fixed".
- Employee / Group: Select who is eligible for this allowance. For example, the group "$ALLW - Laundry".
- Value: Enter the amount to be paid, e.g, "$1.2" or as per the applicable rate.
- Apply After: Enter the hours worked as "0.1".
- Multiplier Count: Enter the default value of "1"
- Classification: Select "Allowance".
- STP Category: Select Laundry (or confirm the appropriate STP category based on ATO guidance or your award)
- Timesheet Lookup: Select Days in the drop down and select "Equal (=)"
In this instance, you will need to set up similar rules for the following days of the week. The only variables to each day will be the following:
Day 2:
- Value: Enter the amount to be paid, e.g, "$2.4" or as per the applicable rate.
- Multiplier Count: Enter the default value of "2"
Day 3:
- Value: Enter the amount to be paid, e.g, "$3.6" or as per the applicable rate.
- Multiplier Count: Enter the default value of "3"
Day 4:
- Value: Enter the amount to be paid, e.g, "$4.8" or as per the applicable rate.
- Multiplier Count: Enter the default value of "4"
Day 5:
The final day is set to "Greater (>=)" to only pay up to 5 days in the week.
- Value: Enter the amount to be paid, e.g, "$5.98" or as per the applicable rate.
- Multiplier Count: Enter the default value of "5"
- Timesheet Lookup: Select Days in the drop down and select "Greater (>=)"
Please note that this rule applies to a weekly pay cycle. Longer pay cycles will require more rules to be set up for each day of the cycle.